Showing posts with label Cake Decorating. Show all posts

Tuesday, April 26, 2011

Coloring Fondant to Deep Colors

Hey all!  A few weeks back, I wrote a post about fondant.  I did not really cover coloring fondant, as I often prefer to avoid the hassle and simply buy the fondant pre-colored.  This, however, is not always possible, and you are left to color your own fondant.  The lighter colors are easily done with gel color, but the darker colors are extremely difficult to achieve without ruining the consistency of the fondant.  One of my favorite blogs, cakesdusoleil, just wrote a post covering how to color without changing the consistency.  She deals with blue, red and black which are the hardest of all of them.

As a side note, she is also an incredibly gifted sugar artist with amazing tutorials ... if you have a few minutes take a look.

Happy Baking!!

Wednesday, March 9, 2011

A Word on Fondant

Hello all!  After posting my last cake I have received several comments from people who have not yet tried covering a cake with fondant and would like to learn.  I am actually less than an expert at this so I'd like to direct you to a few sources that might be a whole lot better to learn from.  Before I do, let me share with you a few things I've learned about fondant.

There are two widely used brands of fondant:  Satin Ice and Wilton.  Wilton is very easy to use and I would recommend it for a beginner, however it is definitely not the best tasting stuff in the world.  Generally when I use Wilton, I put a very thick layer of buttercream underneath so that those eating the cake have the ability to peal it off and eat the cake with only buttercream. :)  Satin Ice, on the other hand, tastes much, much better than Wilton's.  The only difference with Satin Ice, is that it is much more supple than Wilton's and therefore needs to be rolled slightly thicker than Wilton's.  Satin Ice is also not as commonly carried, but can be ordered online fairly inexpensively from retailers such as Global Sugar Art.

Now there are more options for fondant than just these two.  The newest fondant is called Fondarific.  I just ordered a sample pack recently so I cannot speak for how it handles, but I will speak for how it tastes.  It is by far the best I have tasted, and has the most variety of flavors.  There is also Marshmallow Fondant which you can make at home.  I think it tastes kind of like those orange circus peanut candies which I am not totally fond of, but most people really enjoy the taste over others.  The link built in for you is for Edna de la Cruz's site.  She has some excellent tutorials and recipes if you ever need help with anything.

As for coloring the fondant, while it can be done at home, I suggest simply ordering the color you wish to use.  Coloring the fondant itself can really change the consistency of the fondant and make it difficult to work with.  To me, its just not worth the time it takes to mess with the color, its just better to get them premixed.  Most fondants, if wrapped properly, will last for 6 months, making for less waste.

So on to covering the cake.  Wilton has a step-by-step method written out on their website.  There are many videos on You Tube as well.  Personally, I think its easier to learn when you are hands-on.  For that I would recommend a fondant class at your local Michael's.  If you watch for sales, the class itself only cost around $25, although the tools may cost you up to $100.  The nice part is, however, the tools are all made well and last for a very long time, so you can look at it as an investment into your future cake decorating.  Once you do it and get the hang of it, fondant is a fun medium to work with and really looks professional when all is said and done.

Next time I work with fondant, I will see if I can put together a tutorial or at least some pictures.  Please let me know if there is anything else you are looking to find out and I will happily research it for you.

Happy Baking!!

Saturday, February 26, 2011

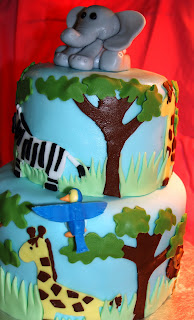
Safari / Jungle Cake

The hardest part of making a cake is always delivering it.  Its like you are dropping off your child.  Ok, not that bad, but I often feel that way when I see it go. :)  C'est la vie.

It has been delivered and my friend LOVED it. :)  Actually loved might be a little understated.  She jumped up and down and screamed.  I don't think I've ever gotten such a great reaction to anything I've done before!

And I hope you all agree, so without further ado . . .


Happy Baking!

Friday, February 25, 2011

Fondant Safari Animals - Part II

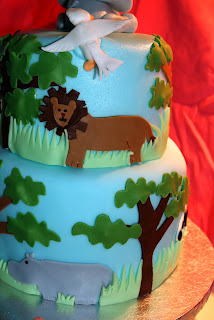
I know I promised these a few days ago, but I get kinda swept up in the moment when making a cake and forget about everything else, so please forgive me.  As promised, here are the lion and hippo . . . 


They have since joined their friends on the side of the cake, which is a beautiful sky blue color.  Oh, and here are the tree bottoms:


Which have also joined their friends on the cake and been adorned with bush-like leaves, and enjoying the feel of the grass whipping against their sugary trunks . . . 

Oh wait, did I forget to tell you that the cake was done?  I did?  Silly me!!  It is stacked and decorated in all its coolness in my refrigerator.

Happ.......

I'm sorry, were you expecting pictures? :)  I know, I'm terrible . . . but at least you gave me a good laugh.  I do not show pictures of cakes on the blog until the cake is delivered.  And since I am delivering it tomorrow morning I should expect to see you all up, awake, and checking my blog between 10 am and 12 pm for final pictures. :)

Lets try this again . . . 

Happy Baking!! 


Wednesday, February 23, 2011

Fondant Safari Animals

This week I got a call from a friend asking if I could make a cake.  I had a general idea of what she was looking for, so I went online for some ideas.  In the process I realized that I was going to need to make a few fondant safari animals, specifically an elephant, tiger, giraffe, zebra, and hippo.  The question was then whether I should make them two dimensional or three dimensional.

And so, I drew out a design.


Gotta love the drawings right?  Maybe I should go to art school someday . . . 

I tried the cake idea with 2D animals.  My friend came back and asked that we remove the age and the snake, but loved the rest of the cake.  No problem!  So I thought a little bit more and decided . . . lets convert one of these animals to 3D for the top of the cake.  The birthday girl's favorite animal was the elephant - which made this choice very easy!

I found a great tutorial on You Tube from Tea for Two Bakery in Ontario, Canada.  It was so good, I wanted to share it with you (with her permission of course)!


While watching the video, I attempted the process.  What I ended up with was so amazing, I couldn't even believe I had made it!  Great tutorial Tea for Two!!

Before Eyes . . . 


I was super-pleased with how he came out and so I decided to try and attempt a few 3D birds to replace the snakes on the cake . . . 


Two cockatoos, and two parrots.

(In case you are wondering they are drying on greased wax paper so that they don't stick.)

The elephant took approximately 40 min to an hour, and the birds (all four) took about an hour (including coloring the fondant).  I was in love. :)

I began on the 2D animals next.  There are very few cookie-cutters or outlines that looked the way I wanted the animals to, so I ended up drawing my own outlines for all four animals.  I began last night with the zebra and giraffe.

I should mention that since I am crunched for time to finish the cake, I do not have tutorials on anything I did.  However, I have had a blast making them and could easily be convinced to do one or two tutorials and even post the outlines of the animals for you to use.  Just leave me a comment and I will be happy to reply. :)

Ok, so without further ado . . . the giraffe and zebra.


And this is the pan drying in my kitchen:


Tonight will be lions and hippos, and tomorrow the cake assembly will begin.  Look for more posts as the week goes.  And again, if you want to see any of these as a tutorial or you want the outlines, leave me a comment. :)

Happy Baking!

Monday, August 23, 2010

THE CAKE!!!!

The cake made it to Connecticut in three pieces, fondant and flowers intact. After painting the cake Friday evening, and arranging the flowers for four hours on Saturday, they were finally finished. Okay, you have all listened to me long enough. So without further ado, the final cake pictures . . .


Thanks for listening about this cake! It was by far the most difficult I have attempted and I am THRILLED with the way it came out. Props to my husband who was instrumental in packing, transporting, and consulting on the arranging of the cakes. I think we had a lot of fun together. Now on to the next bakery challenge . . .


Thursday, August 19, 2010

In Between Photos


Okay, so I sat down to do the cakes and had never worked with the Satin Ice Fondant before. I was told to roll it thicker than Wilton (which is totally correct) but knew nothing else about it. I found a few things.

1. It tastes infinitely better than Wilton's.
2. It has a hard time supporting its own weight because of how soft it is. Translation - the basket-weave imprinter did not work because it continually broke.

So, with the imprinter not working, I went to plan two, cut strips individually and weave my own basket. I actually LOVE the results.

This is the ten inch cake, followed by the eight inch, and then a photo of my hysterically filled refridgerator:


It took longer but I really love them. They are not yet painted (that will happen in CT) so the color will be much darker. Today I food process the oreo's for "potting soil", and pack tools for Connecticut. Then I spend most of the day praying that all three cakes successfully make the trip. :)

The next pictures you should get will be cakes that are completed!! :)

Monday, August 16, 2010

The Final Tally

Okay, so my daughter fell asleep at 5:30 for the night and my husband fell asleep at 8:30. So I went a little crazy and finished the remaining flowers / leaves for the cake.

These are the remaining 4 carnations, and then 16 "drop" flowers . . .


Then came the leaves, all 120 of them . . .


The fantasy flowers were already done in pieces and needed assembled. There are 12 of them . .


And then there were the roses. My husband hung up these wonderful organizational shelves in June to give us a little more room. He had no idea that they were PERFECT for hanging flowers or that most of my cake stuff was going to take up the shelves. He is such a wonderful man for putting up with me and my obsessions. :) Either way, I laugh every time I see them so I took some pictures of them hanging and then one with the details.


The end tally for flowers/decorations:

17 - white mums
15 - pink roses
12 - purple fantasy flowers
15 - yellow daisies
12 - drop flowers (orange, purple, pink)
8 - white carnations (ready for tinting)
120 - leaves (moss green and leaf green)

The remainder of the week will be spent baking and positioning the cakes (one 6", one 8", and one 10"), covering them in fondant basketweave, and transporting them to Connecticut for the final decorations. I will try to take an in between picture of just the fondant, and then the final picture before we set up the cake in Connecticut. I'm so psyched.....


Sunday, August 15, 2010

Flower week / month


So, flower week was rudely interrupted by an illness . . . please forgive me for my lack of a post! However, rather than only spanning a week, flower-making has decided to span several days / almost a month! I am finishing up with all of my gum paste decorations this week in preparation for the cake which will be created next week.

Let me interrupt cake talk for one moment though. I have been searching the globe (via internet of course) for a satisfactory cinnamon muffin recipe . . . and I have found one! Now, normally I don't share recipes (proprietary bakery information . . . lol) but this one, well this one I cannot lay any claim to because it is fantastic, and needs no tweaking. Give them a try . . . they are super easy and taste fantastic . . . sort of like those home made donuts that you get from a cider mill, only less fattening and in muffin form!


Ok, back to caking. Yesterday was the day of the rose. I am still working on getting my pictures uploaded, so all I have for you is a picture of the adorable lace butterflies that I made . . . better pictures of those on the camera as well, but these will work for now. They were a little heavy on the shimmer dust, but what can I say, I'm a work in progress. I also painted the bodies with silver pearl dust, so I will take more pictures of the finished product. For instructions on making these go to . . .


Tonight, carnations, drop flowers, and lots of leaves . . . pictures to follow.

Oh and I learned a few things about gum paste:

1. Tylose gum paste ruffles beautifully for flowers and is easy to work with once you work it in. However there are some downfalls. It doesn't seem to take well to being rolled out over and over again for cut outs. It actually gets grainier and grainier, even with mixing in crisco. Also, its a bit whiter than the Wilton Brand, but not ridiculously noticeable.

2. Wilton Gum Paste (the already made container) is much easier to roll out over and over, however does not ruffle as well. That can be modified by the thickness of the gum paste . . .

of course this is just my experience, I would give it a try yourself . . .

Monday, July 19, 2010

Flower Week


First an update: The Tinker Bell cake did not exactly happen. Unfortunately, the air conditioner went ka-put three days before cake-day and I had absolutely NO time to prepare the gumpaste decorations. So, instead I made my own ice cream cake, frosted it with whipped cream, covered it in purple sprinkles and put a Tinker Bell candle on top!! That combined with purple frosted chocolate and vanilla cupcakes with purple sugar topping and wha-la! A quick and wonderful birthday. And for those of you who are like me and are thinking, "gee, how in the world do you make an ice cream cake at home?" . . . well, I'm glad you asked. Here's the recipe.

ICE CREAM CAKE

1/2 cup Hot fudge ice cream topping, warmed
1 tub (8 oz.) COOL WHIP Whipped Topping, thawed, divided
1 pkg. (3.9 oz.) JELL-O Chocolate Instant Pudding
8 OREO Cookies, chopped (about 1 cup)
12 vanilla ice cream sandwiches
1 half gallon chocolate ice cream

POUR fudge topping into medium bowl. Whisk in 1 cup COOL WHIP. Add dry pudding mix; stir 2 min. Stir in chopped cookies. (I put them in a food processor and it seemed to work well)

ARRANGE 4 ice cream sandwiches, side-by-side, on 24-inch-long piece of foil; top with half the COOL WHIP mixture; top with one layer of chocolate ice cream. Repeat layers. Top with remaining sandwiches. Frost top and sides with remaining COOL WHIP. Bring up foil sides; double fold top and ends to loosely seal packet.

FREEZE 4 hours or until firm.


Now, onto flowers. This week has been aptly named the week of the flowers. I have just recently realized that I have only a few weeks before the cake for my grandmother and I should get on with making my flowers. So last night was the first marathon night, and I have big plans for tonight. :)

Last night's damage . . .

2 full mums. LOVE them, so I'm making more.

15 mum bases for further creations
And the remainder of the night was spent reworking the tylose gumpaste and coloring a bunch for the creation of rose bases this evening. Let me make a suggestion. If you are going to color your gumpaste, try to do so before storing it in the fridge. It was a huge workout to get it soft and then another to color it. I was slightly exhausted when it was all said and done.

This evening's task, 17 rose bases, tinted purple gumpaste (I am going to have arms of steel when all is said and done), and as many "fantasy flowers" as I have the strength to create after coloring. Way, way too much fun. :)

Thursday, June 24, 2010

Tylose Gumpaste

So, after my slightly failed attempt at fondant, I decided to make a few modifications to preparation and try making gumpaste. Mostly because its a whole lot cheaper, but also because I have to conquer it. :) I got a recipe from www.designmeacake.com and decided to try it. I ordered the tylose and also bought the brand confectioners sugar and sifted it before I mixed it today. Its refrigerating as we speak. I know this is going to sound silly, but this is way, way too much fun! :) I'll write tomorrow to say how it handles....from the looks of it after just the initial mixing, it looks just like the wilton ready made, a bit grainy . . . but Edna said that it will be less grainy after it rests.

See you tomorrow! :)

Wednesday, June 23, 2010

Night Three, Wilton Class Two

So, last night I decided I do indeed like Royal Icing, it just takes some getting used to. I like that you can smooth royal icing with cornstarch and manipulate it a little . . . which you can't do with butter cream. Also, I think after the first night and a little practice, these flowers looked better so I felt more like they looked real rather than fake and piped. I might even use a few of these on the cake in August . . .

The first was a violet. These were very simple and awfully cute I think . . .


Second was the daffodil. If you can see the petals are piped and then gently squeezed to a point. I thought they came out adorably. :) And aside from the use of the tip 1 (very very hard to squeeze) I really really like this flower!


But my absolute favorite was the lily. I made several and hope to make several more. The white was perfect because I can just use color mist to make them into whatever color I need for the cake in August.

So next week is our final cake. My instructor is graciously allowing me to try the fondant basket weave instead of the butter cream basket weave, on the cake so that I can give it a shot before August (Thank you Mary!) and then fill it full of flowers we made in this course. This will give me a shot at designing the cake and making sure the fondant will work. I'm really excited.....and hopefully I will have lots of pictures to show you my attempt. :)

Thursday, June 17, 2010

Marshmallow Fondant

Okay, so I tried making my own fondant since the stuff is so expensive and tastes horrible. I did today and I think it looks great . . . I have to try to roll it out and everything this weekend sometime (since it needs to rest overnight) and see how I really like it. But for those of you who want to try it, here's a link to the recipe that was recommended to me.

http://cakecentral.com/recipes/1949/marshmallow-fondant-mmf

I found it was a lot easier than I thought it would be, so as long as you have about a half hour I would give it a shot. I'm still thinking it might be a bit easier to order my own fondant for the august cake, but I will see how this handles first.

*UPDATE*

Ok, so it rolls out and handles great, but I got a bunch of little hard powdered sugar pieces in it. I think I need to sift it next time. But to be on the safe side, I think I'll go with Satin Ice for the August cake. I'll try marshmallow fondant for Kay's birthday cake maybe. :)

Oh and it tastes GREAT!!

Wednesday, June 16, 2010

Night Two, Wilton Class Two

Three Flowers . . .

This is the apple blossom. Let me tell you, the yellow dots with a #1 tip, very hard! :)


This is a primrose . . .


And this is the famous Wilton Rose . . .

It was my first experience with royal icing . . . and I'm still not sure how I feel about it. I want to see them when they are completely dry . . . I feel like the gumpaste looks more professional, but its entirely possible that I'm just too much of an amateur on royal icing. So sad, I suppose more practice is needed! (evil cackle!!)

And I am so thankful for my instructor Mary. The poor woman, I bombard her with questions, but she always has an answer or suggestion . . . I love it! She completely goes above and beyond what the course calls for, I am so thankful for her!

Sunday, June 13, 2010

Basket Cake

Found the link to the tutorial I think I will use for my basket cake.


It is beautiful and much easier than what I was thinking . . . what do you think?